

")

Web development
How to Install and Use WPScan WordPress Vulnerability Scanner Ubuntu 18.04
This guide discusses how to Install and Use WPScan WordPress Vulnerability Scanner Ubuntu 18.04. WPScan, which is an acronym for WordPress Security Scanner, is a free black box vulnerability scanner written on Ruby programming language to help security professionals and blog maintainers to test the vulnerabilities on their WordPress sites. It helps unearth any vulnerability associated with WordPress themes, plugins, or any other security threat harbored on a WordPress site.
Installing WPScan Ubuntu 18.04
Prerequisites
Before you can install WordPress Security Scanner (WPScan), ensure that the following dependencies are installed.Also ensure that your system is up-to-date. This can be done by running the commands below;
sudo apt update
sudo apt upgrade
sudo apt install curl git libcurl4-openssl-dev make zlib1g-dev gawk g++ gcc libreadline6-dev libssl-dev libyaml-dev libsqlite3-dev sqlite3 autoconf libgdbm-dev libncurses5-dev automake libtool bison pkg-config ruby ruby-bundler ruby-dev -y
WPScan can either be installed fron RubyGem repositories or from sources. The former is simpler as it involves a one line command.
Install from RubyGem
To install WPScan from RubyGem repositories, run the command below;
gem install wpscan
You can at the same time uninstall WPScan by running the command;
gem uninstall wpscan
Install WPScan Sources
To install WPScan from sources, you first need to its Github repository.
git clone https:gem//github.com/wpscanteam/wpscan.git
Once the cloning is done, navigate to WPScan directory and run the commands below to do the installation.
cd wpscan/
bundle install
sudo rake install
Do you have patience? If you don’t, this is where might have to learn to have a little since it may take some few mins to complete the installation. If the installation is successful, you should see such an output.
...
  48) WPScan::Vulnerability behaves like WPScan::References references when references provided as array
     # Temporarily skipped with xit
     # ./spec/shared_examples/references.rb:45


Finished in 8 minutes 54 seconds (files took 15.12 seconds to load)
17914 examples, 0 failures, 48 pending

Coverage report generated for RSpec to $HOME/wpscan/coverage. 1709 / 2006 LOC (85.19%) covered.
wpscan 3.4.0 built to pkg/wpscan-3.4.0.gem.
wpscan (3.4.0) installed.
Well, WPScan is successfully installed on Ubuntu 18.04. To obtain a description of various command line options used with WPScan, run wpscan command with -h/--help option;
wpscan -h
_______________________________________________________________
        __          _______   _____
        \ \        / /  __ \ / ____|
         \ \  /\  / /| |__) | (___   ___  __ _ _ __ ®
          \ \/  \/ / |  ___/ \___ \ / __|/ _` | '_ \
           \  /\  /  | |     ____) | (__| (_| | | | |
            \/  \/   |_|    |_____/ \___|\__,_|_| |_|

        WordPress Security Scanner by the WPScan Team
                       Version 3.4.0
          Sponsored by Sucuri - https://sucuri.net
      @_WPScan_, @ethicalhack3r, @erwan_lr, @_FireFart_
_______________________________________________________________

Usage: wpscan [options]
        --url URL                                 The URL of the blog to scan
                                                  Allowed Protocols: http, https
                                                  Default Protocol if none provided: http
                                                  This option is mandatory unless update or help or hh or version is/are supplied
    -h, --help                                    Display the simple help and exit
        --hh                                      Display the full help and exit
        --version                                 Display the version and exit
    -v, --verbose                                 Verbose mode
        --[no-]banner                             Whether or not to display the banner
                                                  Default: true
    -o, --output FILE                             Output to FILE
    -f, --format FORMAT                           Output results in the format supplied
                                                  Available choices: cli-no-color, json, cli, cli-no-colour
        --detection-mode MODE                     Default: mixed
                                                  Available choices: mixed, passive, aggressive
        --user-agent, --ua VALUE
        --random-user-agent, --rua                Use a random user-agent for each scan
        --http-auth login:password
<output cut>
Go through the whole output to see various options that can be used with wpscancommand.
Scanning for Vulnerabilities
In this guide, we are going to show you a few examples on how to perform WordPress blog vulnerability scanning. Ensure that you run the examples below against your OWN blog. It is illegal to scan other people’s sites.
Scan the whole WordPress blog
wpscan --url wordpress.example.com
WPScan can scan both http and https protocols. If not specified, it will scan http by default.
If you want to save the scanner output results in a file, use the -o/--output option.
wpscan --url http://wordpress.example.com -o scan-test
There are three detection modes in which wpscan can run against a WordPress site; passive, aggressive, mixed(default).
- The
passivemode runs a non-intrusive detection i.e it sents a few requests to the server. It commonly scans the home page for any vulnerability. The passive mode is less likely to be detected by IDS/IPS solutions. - The
aggressivemode on the other hand performs a more intrusive scan as it sents a thousand request to the server. It tries all the possible plugins even if the plugin has no known vulnerabilities linked to it. This may result in an increased load on the target server. - The
mixed(default)mode uses a mixture of both aggressive and passive.
To specify detection mode;
wpscan --url wordpress.example.com -o test --detection-mode aggressive
Check for Vulnerable Plugins
To scan for vulnerable plugins on your WordPress blog, pass the -e/--enumerate [OPTS]option to the wpscan command where [OPTS] can be; vp (vulnerable plugins), ap(all plugins), p (plugins). For example to scan for every plugin which has vulnerabilities linked to it,
wpscan --url wordpress.example.com -e vp
Check for Vulnerable Themes
Just like we used the -e/--enumerate [OPTS] option to check for vulnerable plugins, the same can be done when checking for vulnerable themes with the [OPTS] being any of the following; vt (Vulnerable themes), at (All themes), t (Themes). For example to scan for themes with known vulnerabilities;
wpscan --url wordpress.example.com -e vt
Enumerate WordPress Users
To find out the users that can login to WordPress site, you would pass the -e/--enumerate u option to wpscan where u basically means the user IDs.
wpscan --url wordpress.example.com -e u
Test for Password Strength/Bruteforce Attack against a WordPress User
Once you have enumerated the usernames, you can try to perform a brute-force attack again them as shown below. This process may be a bit slower depending on the number of passwords specified in the password file (-P, --passwords FILE-PATH) and number of threads (-t, --max-threads VALUE) you are using. For example to brute-force an admin,
wpscan --url wordpress.example.com -P password-file.txt -U admin -t 50
To test for password strength for multiple users, you would use the same command above this time round without the specific username specified.
wpscan --url wordpress.example.com -P password-file.txt -t 50
Run WordPress scan in undetectable mode
To run wpscan in a stealthy mode which basically means (--random-user-agent --detection-mode passive --plugins-version-detection passive), specify the --stealthyoption.
wpscan --url wordpress.example.com --stealthy
That is all about WPScan. Feel free to explore this useful tool. We hope this article was helpful.
SOURCE: https://kifarunix.com/install-use-wpscan-wordpress-vulnerability-scanner-ubuntu-18-04/
How to disable directory browsing in WordPress
Disabling directory browsing in WordPress or any other CMS or website for that matter requires access to the base directory via FTP or some file manager like cPanel.
There are various free FTP clients that will help you here, a good option is FileZilla.
You simply need to create an .htaccess file with the following line of code in it:
Options All -Indexes
Then upload the file back to the respective folder. This is a very general overview of the process. In most cases, you might already have a .htaccess file present inside your WordPress installation directory. It is created when you had changed the permalink settings.
Be very careful – do not overwrite this file, or else you’ll lose all your permalink and other security settings.
If you already have a .htaccess file present, first create a backup. Then, open it in Notepad (or any plain text editor) and paste the following line in the end:
Options All -Indexes
In general, most .htaccess files contain the following code:
# BEGIN WordPress
<IfModule mod_rewrite.c>
RewriteEngine On
RewriteBase /
RewriteRule ^index.php$ – [L]
RewriteCond %{REQUEST_FILENAME} !-f
RewriteCond %{REQUEST_FILENAME} !-d
RewriteRule . /index.php [L]
</IfModule>
# END WordPress
The modified code will look like:
# BEGIN WordPress
<IfModule mod_rewrite.c>
RewriteEngine On
RewriteBase /
RewriteRule ^index.php$ – [L]
RewriteCond %{REQUEST_FILENAME} !-f
RewriteCond %{REQUEST_FILENAME} !-d
RewriteRule . /index.php [L]
</IfModule>
# END WordPress
Options All -Indexes
Save the file, and upload it back in the same directory you downloaded it from, this time overwriting the file. If anything breaks, replace it with your backup file and try the process again.
Install ClamAV Linux Antivirus On Ubuntu 16.04 / 17.10 / 18.04 Desktp
ClamAV, an open source antivirus engine for detecting and removing trojans, viruses, malware and other threats can easily be installed on Ubuntu to help protect your systems… You don’t usually hear antivirus and Linux in the same sentence… however, in today’s environments, viruses and malicious threats can live anywhere…
This brief tutorial shows students and new users how to install ClamAV on Ubuntu 16.04 / 17.10 and 18.04 systems…
ClamAV is by design, versatile…. it supports multiple file formats and multiple signature languages that most viruses use to exploit systems… It performs multi-threaded scans, and include a command-line utility for on demand file scanning and signatures updates..
When you’re ready to install ClamAV, continue with the steps below
On Uubntu desktop, open your terminal by press the Ctrl — Alt — T keys on your keyboard… this should open the terminal…
When the terminal opens, type the commands below to install ClamAV
sudo apt install clamav clamav-daemon
Now that ClamAV is installed, you can use the command line terminal to scan for viruses and malware…. to test out, run the commands below to scan your home folder…
clamscan --infected --remove --recursive /home
You should get a summary after a successful scan…
----------- SCAN SUMMARY -----------
Known viruses: 6541075
Engine version: 0.99.4
Scanned directories: 136
Scanned files: 401
Infected files: 0
Data scanned: 63.20 MB
Data read: 43.88 MB (ratio 1.44:1)
Time: 23.938 sec (0 m 23 s)
To scan for infected files and folder on the entire sysstem, you can run the commands below
sudo clamscan --infected --remove --recursive /
For downloading Clamav virus definitions..
sudo freshclam
Advanced Access Manager (aka AAM) is all you need to manage access to your website frontend and backend for any user, role or visitors.
Advanced Access Manager (aka AAM) is all you need to manage access to your website frontend and backend for any user, role or visitors.
FEW QUICK FACTS
The only plugin that gives you absolute freedom to define the most granular access to any aspect of your website and most of the feature are free;
Bullet-proven plugin that is used on over 100,000 websites where all features are well-tested and documented. Very low amount of support tickets speaks for quality;
It is the only plugin that gives you the ability to manage access to your website content for any role, individual user and visitors or even define the default access to all posts, pages, custom post types, categories and custom hierarchical taxonomies;
AAM is developer oriented plugin. It has dozens of hooks and configurations. It is integrated with WordPress RESTful and XML-RPC APIs and has numerous abstract layers to simplify coding;
No ads or other promotional crap. The UI is clean and well crafted so you can focus only on what matters;
No need to be a “paid” customer to get help. Request support via email or start chat with Google Hangout;
Some features are limited or available only with premium extensions. AAM functionality is transparent and you will absolute know when you need to get a premium extension;
MAIN AREAS OF FOCUS
Access & Security Policy allows you to define who, when, how and under what conditions your website resources can be accessed;
Content access control on frontend, backend and API sides to posts, pages, custom post types, categories, custom hierarchical taxonomies and CPTs for any role, user and visitors;
Roles & capabilities management with ability to create new roles and capabilities, edit, clone or delete existing;
Access control to backend area including backend menu, toolbar, metaboxes & widgets;
Access control to RESTful & XML-RPC APIs;
Developer friendly API so it can be used by other developers to work with AAM core;
And all necessary features to setup smooth user flow during login, logout, access denied even, 404 etc.
THE MOST POPULAR FEATURES
[free] Manage Backend Menu. Manage access to the backend menu for any user or role. Find out more from How to manage WordPress backend menu article;
[free] Manage Roles & Capabilities. Manage all your WordPress role and capabilities.
[free] Create temporary user accounts. Create and manage temporary user accounts. Find out more from How to create temporary WordPress user account;
[limited] Content access. Very granular access to unlimited number of post, page or custom post type (19 different options). With premium Plus Package extension also manage access to hierarchical taxonomies or setup the default access to all post types and taxonomies. Find out more from How to manage access to the WordPress content article;
[free] Manage Admin Toolbar. Filter out unnecessary items from the top admin toolbar for any role or user.
[free] Backend Lockdown. Restrict access to your website backend side for any user or role. Find out more from How to lockdown WordPress backend article;
[free] Secure Login Widget & Shortcode. Drop AJAX login widget or shortcode anywhere on your website. Find out more from How does AAM Secure Login works article;
[free] Ability to enable/disable RESTful and XML-RPC APIs.
[limited] URI Access. Allow or deny access to any page of you website by the page URL as well as how to redirect user when access is denied;
[free] Manage access to RESTful or XML-RPC individual endpoints for any role, user or visitors.
[free] JWT authentication. Authenticate user with WordPress RESTful API and use received JWT token for further requests. Fid out more from Hot to authenticate WordPress user with JWT token
[free] Login with URL. For more information check WordPress: Temporary User Account, Login With URL & JWT Token article.
[free] Content Filter. Filter or replace parts of your content with AAM shortcodes. Find out more from How to filter WordPress post content article;
[free] Login/Logout Redirects. Define custom login and logout redirect for any user or role;
[free] 404 Redirect. Redefine where user should be redirected when page does not exist. Find out more from How to redirect on WordPress 404 error;
[free] Access Denied Redirect. Define custom redirect for any role, user or visitors when access is denied for restricted area on your website;
[free] Manage Metaboxes & Widgets. Filter out restricted or unnecessary metaboxes and widgets on both frontend and backend for any user, role or visitors. Find out more from How to hide WordPress metaboxes & widgets article;
[paid] Manage access based on IP address or referred domain. Manage access to your website for all visitors based on referred host or IP address. Find out more from How to manage access to WordPress website by IP address article;
[paid] Monetize access to you content. Start selling access to your website content with premium E-Commerce extension. Find out more from How to monetize access to the WordPress content article;
[free] Multisite support. Sync access settings across your network or even restrict none-members from accessing one of your sites. Find out more from AAM and WordPress Multisite support;
[free] Multiple role support. Finally AAM supports multiple roles per user WordPress access control for users with multiple roles
[and even more…] Check our help page to learn more about AAM
How to configure passive ports range for ProFTPd on a server behind a firewall?
The PassivePorts directive is used in the file /etc/proftpd.conf to specify a passive ports range.
-
Connect to the Plesk server via SSH.
-
Create
/etc/proftpd.d/55-passive-ports.conffile using the following command:# touch /etc/proftpd.d/55-passive-ports.conf
-
Edit file
/etc/proftpd.d/55-passive-ports.confin any text editor and place the content below as follows:<Global>
PassivePorts 49152 65535
</Global>Note: Remove PassivePorts directive from
/etc/proftpd.conffile if the directive is defined inside. -
Specify ports in
/etc/proftpd.d/*files as well, if needed. See the ProFTPd documentation for more information regarding thePassivePortsdirective. -
Next, the
nf_conntrack_ftpmodule should be loaded into the system:# /sbin/modprobe nf_conntrack_ftp
# lsmod | grep conntrack_ftp
nf_conntrack_ftp 13696 0
nf_conntrack 61684 1 nf_conntrack_ftp -
If Plesk Firewall is installed and enabled, specify the port range according to the KB article Unable to connect to FTP in passive mode.
If another firewall is used to manage
iptablesrules, use it to allow the passive ports range.Otherwise, make sure that the following line exists in the
iptablessettings:# iptables -A INPUT -m state --state RELATED,ESTABLISHED -j ACCEPT
-
If a server is behind the NAT, the
nf_nat_ftpmodule should be loaded:# /sbin/modprobe nf_nat_ftp
In case if FirewallD on CentOS 7 is installed, NAT modules should be added into
/etc/modules-load.d/iptables.conf# echo nf_nat_ftp >> /etc/modules-load.d/iptables.conf
# echo nf_conntrack_ftp >> /etc/modules-load.d/iptables.confNote: the action which involves kenel modules configuration should be performed on the barebone hardware or in the virtual machine with full hardware emuation.
It the container is used, the same actions should be performed on a hardware node side. -
To keep the changes after a system reboot, the modules should be added to the
IPTABLES_MODULESline in the file/etc/sysconfig/iptables-configas follows:# cat /etc/sysconfig/iptables-config | grep IPTABLES_MODULES
IPTABLES_MODULES="nf_conntrack_ftp nf_conntrack ip_nat_ftp"Note: Because the FTP helper modules must read and modify commands being sent over the command channel, they will not work when the command channel is encrypted through use of TLS/SSL.
-
If it is required to use TLS/SSL for FTP, the only way is to open required ports. Use Plesk Firewall extension for this, or add the rules using iptables:
# iptables -I INPUT 2 -p tcp --match multiport --dports 49152:65535 -j ACCEPT
# service iptables saveNote: Ports should be opened on all firewalls in the network.
-
Restart the xinetd service to apply changes:
# service xinetd restart
From: https://support.plesk.com/hc/en-us/articles/213902285
How to Protect WordPress from XML-RPC Attacks
WordPress is the most popular Content Management System. This popularity makes WordPress a perfect target for hackers. The most common attack faced by a WordPress site is XML-RPC attack.
Recognizing an XML-RPC Attack
1) Randomly “Error establishing database connection” error is displaying on the WordPress site.
2) “Out of memory” error in the web console.
3) “Cannot open the file no such file/directory” error in web server error log.
4) “POST /xmlrpc.php HTTP/1.0” error in webserver access log.
(Plesk for Linux) Configuring Passive FTP Mode
By default, Plesk allows only active FTP connections. This may result in customers being unable to connect to the server via FTP. To avoid this, we recommend enabling passive FTP. This topic explains how to enable passive FTP mode in Plesk for Linux.
To enable passive FTP mode in Plesk for Linux:
- Log in to your server via SSH as the root user.
- Create the
/etc/proftpd.d/55-passive-ports.conffile, add the following lines to it, and then save the changes:<Global>PassivePorts 49152 65535</Global> - Run the following command:
systemctl restart xinetd
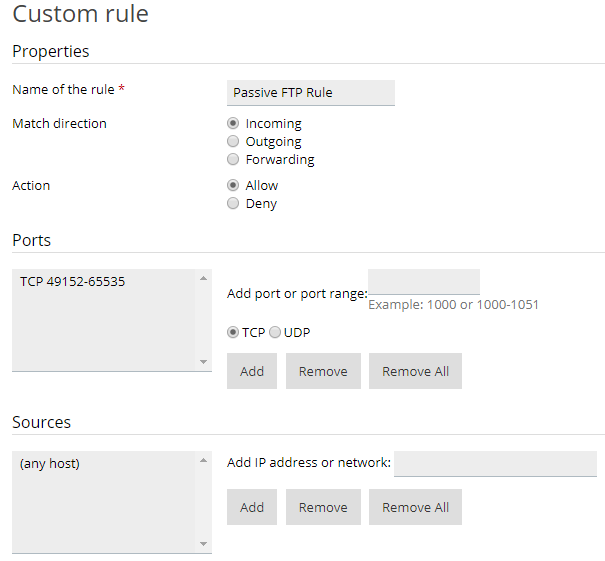
Now your Plesk server accepts passive FTP connections. If you have installed the Plesk Firewall and switched on its default configuration, you need to add a firewall rule allowing passive FTP:
- Direction: Incoming
- Action: Allow
- Ports: TCP 49152-65535
- Sources: (any host)
Buscar
Date of publication
Filter by category
Nuestros Partners
Search Post
About CNERIS
CNERIS is a company formed by young entrepreneurs from different sectors of the world of information. Our team consists of programmers, system administrators, graphic designers.